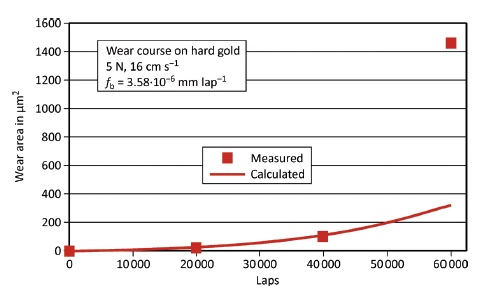
This work was motivated by utilisation of the widespread ball-on-disc (BOD) method for potentially characterizing galvanically deposited layers, especially gold/copper/cadmium alloy layers (“hard gold”) deposited on polished 100Cr6-steel discs (Φ 18 mm) using a special module. The friction balls consisted of smooth alumina and exhibited a diameter of 6 mm. For comparison, similar experiments were made on pure steel-discs. Besides of friction diagrams, profiles were detected by means of a separated profilometer allowing the volumetric determination of the abrasion (wear). To visualize their often irregular shapes, the shape of the friction ball was placed computationally onto the grooves. Due to the semi-chaotic process, the reproducibility was only minor. Nevertheless, some fundamental tribological relations could be found. In particular, the established hypothesis of Achard and the related assumption of a material-specific, time-independent wear coefficient appeared to be inappropriate and thus untenable. Rather, observation showed that wear decreases not linearly but over-proportionally over time, particularly implicating the number of cycles (laps). Furthermore, when the rotation rate increases, a higher load is required to ensure steady abrasion. Although this method allows numerical characterizations of galvanic layers by means of specific constants such as the friction impact constant KW, revealing an obvious qualitative difference between steel and hardgold-plated steel, it is probably not optimum for such systems since it deviates too much from the real conditions of operation. However, the hereby found tribological laws could be of eminent general interest.
1 Introduction
The present investigations were motivated by our search for a method of characterizing galvanically deposited gold/copper/cadmium alloy layers (here referred to as hard gold layers). These are used on collector rings for process control and their excellent properties make them the first choice for many applications. On the one hand, they are chewy-hard, i.e., relatively hard but not brittle, and on the other hand, corrosion resistant and thus ensuring low contact resistance as well as long-term stability. This coating was originally developed by Werner Flühmann and coworkers and is available as Galvatronic® (Collini AG, Dübendorf, Switzerland).
An apparatus for testing such collector rings was described in the early seventies [1]. It allowed measuring friction coefficients and transition resistances and was used to determine wear gravimetrically. Experiments focused on rotating collector rings (Ø98 mm) with and without electrical current passing through. Different from today’s arrangements, rectangular and rather smooth brushes of sintered graphite were used as collectors. Abrasion on the brushes was considerably higher than that of the rings.
Flühmann et al. used a custom testing apparatus which, other than commercially available equipment, did not deliver any comparable results. A later paper [2] presented further results acquired by means of the ball-on-disc method (BOD), used widely nowadays, however without listing the test conditions. The method is subject of the present work which is based on measurements conducted by EMPA (Swiss Federal Laboratories for Material Science and Technology, Dübendorf, operator Sigfried Roos). After the described early investigations, the method turned out to be not easily applicable. It afforded further investigations concerning influences of testing conditions, especially comparative measurements on steel. Even though many experiments were conducted, only very few yielded useful results due to often chaotic characteristics. An important issue was to determine a material-specific parameter suitable for a tribologic characterization of surface layers.
BOD is used mainly for determining friction coefficients. For this, the tangential force is measured which is induced by a ball pressed onto a rotating disc using a weight [3]. Additionally, in selected cases the cross-section profile of the groove-shaped friction mark can be determined using a mechanical depth sensor (profilometer). However, custom tribometers usually do not allow online measurements, i.e., discs to be measured need to be removed from the tribometer for such measurements. A special online sensor was available but intended for acquiring data only at a single point in the profile and thus did not deliver any useful results.
Since such measurements are performed on flat disc-shaped underground, a piece of custom equipment was designed (Ø60 mm, Fig. 1) containing dummies instead of collector rings and insertions adequate for the desired characterization methods, i.e., for the steel discs used in tribological measurements (from polished and hardened 100Cr6-steel, Ø18 mm). Thus, the method is not applicable to tribological measurements using collector rings in their original shape but requires a transposition into a planar shape where the size of the collector ring limits the diameter of the disc.
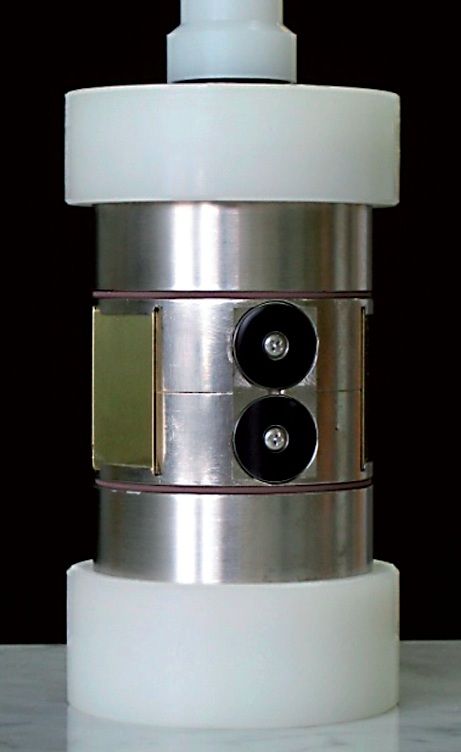
Fig. 1: Deposition module with replaceable steel discs
2 Concepts of Tribology and BOD
Friction is an important aspect in all fields of technology considering, e.g., brake pads that need maximum static friction or, in contrast, rotating shafts in bearings, ball bearings, and sliding contacts on collector rings (also called abrasive rings) in electric motors or generators. The latter require low dynamic friction, particularly minimum wear (abrasion) and low contact resistance. Thus, requirements on the materials used are quite different, depending on the field of application and especially when long-term strain is an issue. In any case, a basic concept is that friction always implies two interacting components called friction partners. Therefore, to a certain degree, any friction-determining material feature is relative to the friction partner applied. Differences in hardness of the two partners are of interest. According to [4], a combination of (hard) palladium with (soft) silver is beneficial compared to combining palladium with palladium. In principle, friction partners should be of different hardness. Besides material features, topology, i.e., the geometry of surfaces involved and their susceptibility to change, plays a dominant role. In addition, oily lubricants are often used, making the conditions even more complex. In this work, we will focus on dry friction.
These topics of tribology, or the science of friction, are covered comprehensively in [5]. In view of the complex nature of material properties, a characterization problem arises since constant well-reproducible and material-specific values can not be found for the two most important measurable parameters, i.e., friction coefficient and (path-dependant) wear or wear coefficient. This is due to the influence of friction constellations as well as friction partners, and to the fact that in all cases the surface of at least one of the friction partners changes due to wear, plastic deformation, and corrosion proceeding over time, in particular when a hard body interacts with a soft counterbody.
In practice, the friction coefficient μ is the most important term in tribometry. Its definition is based on the fact that a rectangular block exhibits the same friction upright as downright. The friction force FR acting against the direction of motion is proportional to the normal force FN, with the nondimensional friction coefficient μ as constant of proportionality:
or rearranged:
This equation shows that the exerted load, rather than pressure (i.e., force per area), is responsible for friction. In addition, the influence of velocity is omitted, so according to Eq. 1, velocity has no influence on friction. Also, the size or radius of the friction ball is missing.
The friction coefficient is usually not constant, in fact, it mostly increases over time. According to [5], for steel/steel combinations, the value is initially very small (approx. 0.1), then increases abruptly to a maximum (approx. 0.8), before it slowly decreases (down to approx. 0.6). In addition, most publications describe an oscillation of friction coefficients around the given averages.
Sometimes the loss of weight of a sample is detected in order to determine abrasion or wear. However, this measurand is inaccurate. It is better to determine wear via the worn volume. This can be acquired by a profilometer using a fine pin to record the profile of wear marks (usually in the micrometer range) after tribotesting. Usually, four scans are made at four different positions. Using the graphically determinable profile area A and the radius R of the (circular) groove, sliding wear WV can be calculated according to
If the profile area is given in μm2 and the groove radius in mm, multiplying by 10–6 yields the volume in mm3. In the context of wear, the wear coefficient kA is often discussed. According to Achard, it is defined as
with kA = 10–6 mm3 N–1 m–1, where FN is the normal force and s the total distance covered. (An analogous relation, however with different parameters, was published by Holm [6].) Its dimension formally corresponds to the reciprocal dimension of hardness [7]. This correlation is based on the trivial assumption that wear is proportional to the distance covered and to the normal force, i.e.,
However, this hypothesis is questionable since actually the effective force of friction FR should have to be considered here, i.e., the product of normal force and friction coefficient according to Equation <1a>, instead of the normal force. Particular in BOD, wear does not increase proportionally to the path or time. Additionally, its characteristic is not even continuous. For example, in [5], a sharp initial increase of wear is assumed as typical for steel/steel pairings, followed by a moderate and a subsequent steeper increase.
Since many factors play a role, such as the shape of friction partners, velocity and especially lap number, this relation can not be referred to as a law, which however is often done. Even more than for friction coefficients, it has to be kept in mind that wear coefficients are not invariant material-specific, distinct quantities because acquired values depend on measuring conditions. For example, according to [8], values between 0.25 and 250 ·10–6 mm3 N–1 m–1 were measured for differently coated steel disks by 23 different labs from 11 countries within a ring test, i.e., values varied by a factor of 1000. Considering this and our own results, the term wear coefficient appears to be unacceptable.
However, wear as a measurand, or better the course of the wear, is still important for tribology. It may be determined by means of a profile, preferably repeatedly and versus the number of cycles (laps). Today, the question whether wear follows a distinct rule is still unanswered. For investigating this with BOD, the following parameters need to be specified:
- material of friction ball
- diameter of friction ball
- load (in N)
- orbiting radius and/or circumference of the path followed by the friction ball
- tangential velocity (in cm s–1), depending on rotation and orbiting radius
- number of cycles (laps)
3 Determination and Description of Groove Profiles
Three-dimensional profiles such as in Figure 2 clearly demonstrate the shape of friction grooves but they are hard to acquire since appropriate apparatus and special software are needed. As the example shows, the grooves can be very uneven and notched. Due to dimensional reasons, this kind of representation requires an optical distortion, leading to a larger scale in the direction across the groove than vertical to the groove. However, in spite of being clear and straightforward, the representation does not allow any quantitative analysis. In particular, it does not deliver any numeric value for the cross-section area, and thus, for wear.
However, it is possible to acquire useful results by utilizing simpler methods such as determining twodimensional sections at selected, preferably four points of the groove by scanning. The apparatus used in our case delivers one measuring point per micrometer. These data may be easily outlined as a profile via Kugelspreadsheet software. Errors due to beveled sample surfaces can be easily compensated for mathematically. For clarity, as in the case above, it is often beneficial to use a larger scale for the y-axis (i.e., depth) than for the (horizontal) x-axis. Furthermore, it is advisable to use the same scales when different profiles are compared.

Fig. 2: Laterally distorted 3D-profile of a hard gold groove formed at 5 N (alumina ball Ø6 mm, 34.9 cm s–1, after 26 500 laps, 555 rpm)
In principle, it is possible to graphically measure and calculate the area of such a profile using a printout. However, when investigating many profiles, such analysis made by hand is expensive and timeconsuming, especially for irregular profiles. If the shape of the profile is more or less circular, the crosssectional area may be calculated via its depth and width. The relevant formulas are explained in Chapter 3.1, including a simplified equation. In addition, the shape of a ball or circle, placed precisely into the cross section computationally (whereby the different scales of the x- and the y-axes are considered), can help to identify possible deviations between the profile and the ideal circle. The relevant algorithm is given in Chapter 3.2.
3.1 Determination of Circle Segment as Profile Area
The goal here is to calculate the profile area S on the basis of either profile depth h or width d, considering the known ball or circle radius r. For calculations using profile depth, the segment area is referred to as Sh, and when profile width is used, Sd. The two different approaches in calculation yield equal values. However, noncircular (nonspherical) profiles produce different theoretical values.

Fig. 3: Calculation of a circle
As Figure 3 shows, the segment area is given by
Here, the segment angle α as well as profile depth h and/or profile width d are unknown, depending on which parameter is used. In addition, the following trigonometric relations apply:
and
where generally sin2(α/2) + cos2(α/2) = 1. This can be combined to
and
where sin–1(x) and cos–1(x) denote the angles to the argument x.
Empirically it has been found that a calculation of the segment area on the basis of profile depth h for a circle radius larger than 3 mm is also possible by using the simplified equation
in which f depends on the circle radius as follows:
f = 103 for r = 3 mm,
f = 119 for r = 4 mm,
f = 135 for r = 5 mm.
For r = 3 mm and very small angles, i.e., for very small profile areas, this formula delivers even more exact results than the explicit formula (Eq. <7>), because in there inaccuracies of the angle calculation occur due to the cosine value close to 1.
3.2 Computational Positioning of Friction Ball within Profile
Here the aim is to calculate the path of a circular arc with radius r and profile depth h according to Figure 4, and to place it centrally into a groove profile in such a way that the secant of the relevant segment lies precisely on the surface line of the profile. Due to the described differences in the vertical and horizontal scales, the shape of this arc is noncircular. The corresponding equation is derived from the Pythagorean theorem and Figure 4:
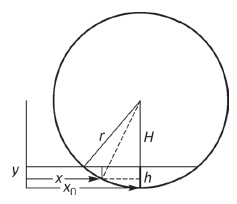
Fig. 4: Calculation of a circle
where H = r–y. Rearranging this square equation to y yields
In the lower part, i.e., within the range of the groove, y is negative.
4 Experimental Method
The results presented here were obtained with an air-conditioned CSEM TRB 14-197 Tribometer at room temperature and 50 percent relative humidity. This apparatus performs a (force) measurement approximately every 12 seconds, e.g., every 20 laps when using a circumferential speed of 5 cm s–1 and an orbiting radius of 5 mm. The force is applied with a weight. Manufacturer data regarding tolerances of the friction ball are not available. For reducing the sand effect by wear particles, a dust extraction system was installed which however turned out to be not very effective.
Due to the radius of the collector rings commonly used today (Ø60 mm) and the radius of the testing module introduced above (Fig. 1), the radius of the höhediscs tested was relatively small, just 9 mm. This applied likewise to the discs coated with hard gold as well as those made of uncoated steel. Thus, the radii in the wear tests were particularly small, probably leading to increasing wear due to stronger influence of tolerances.
The friction balls consisted of smooth alumina with 6 mm diameter. They were replaced frequently. No wear was detected on the balls. In some cases, however, small amounts of (grey-black) powder were deposited on the friction balls, originating from the washers used.
Profilometric measurements relied mostly on the mechanical depth sensor introduced above. However, the course over time of the profile could not be detected in a single test because the measuring device was not designed as an integral part of the tribometer. Instead, several parallel stepwise measurements on the same material at different times or after different numbers of laps were necessary.
4.1 Results of Tests on Steel
The test discs (Ø18 mm) were made of polished 100Cr6 steel and featured a Vickers hardness of approximately 760 HV. The groove radius was in the range of 6 to 8 mm. The tribograms usually give the course of friction versus the cycle number (laps). Test conditions such as load (force) in Newton, tangential velocity in cm s–1, groove radius R in mm, and sample notations are given in the tribograms. In some cases, at the end of the tribological measurements, profiles were detected and evaluated using the methods described above (max. 4 scans). For simple illustrations, a single profile is presented although variations sometimes occurred along the grooves’ paths. As mentioned, the available apparatus did not allow detecting the course of a profile in a single test. Instead, several parallel tests had to be made, and each ensemble delivered a profile.
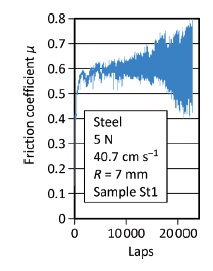
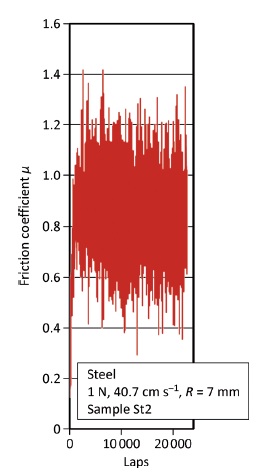
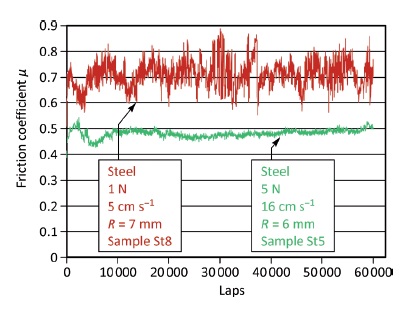
In the profile diagrams, the widths and depths are given in micrometers Tribograms 1 to 3 show the course of friction coefficients on steel under selected test conditions. Comparison at 5 N (Figs. 5 and 7, Tribograms 1 and 3, samples St1 and St5) reveals that, at higher velocity (40.7 vs. 16 cm s–1), considerable oscillation of the friction coefficient occurs gradually. In addition, friction coefficients increase from approximately 0.5 to 0.6. An analogous tendency appears when comparing at 1 N (Figs. 6 and 7, Tribograms 2 and 3, samples St2 and St8, 40.7 vs. 5 cm s–1), with mean friction coefficients increasing from approximately 0.7 to 0.9. However, at higher loads, oscillation and mean friction coefficients decrease. Thus, it appears likely that the oscillation of friction coefficients is due to uneven and rough profiles.
As a general conclusion of the variable results depending on test conditions, and considering the low reproducibility, the existence of a material-specific friction coefficient can not be confirmed. But what can be stated is that mean friction coefficients as well as oscillations of friction coefficients increase with rising velocity and decreasing load. Thus, several optimum combinations of loads and velocities appear possible. Increasing load tends to call for a simultaneous increase in velocity.
We will now consider profiles with the contour of the friction ball inserted computationally (distorted due to scales). With respect to their dependency of the revolution number (laps), different shapes appear, mostly irregular and dented. From the beginning, i.e., after about 20 000 laps, all samples showed different types of deviations from spherical shape (Figs. 8, 9, 12, Profiles 1, 2a, and 3a). Tests with 1 N and 5 cm s–1 performed poorest for all three distances (20 000, 40 000, and 60 000 laps). The curiosity that the groove appears larger after 20 000 than after 40 000 laps can only be explained with low reproducibility of the test runs. The most regular results were obtained with 5 N and 16 cm s–1. However, even here, apart from the deviation after 20 000 laps, final reproducibility after 60 000 laps is far from acceptable. After two test runs, measurements of two spots each yielded 3405, 4069, 4662, and 4389 μm2, with a mean value of 4131 μm2 and standard deviation of 541 μm2 (13.1 %).
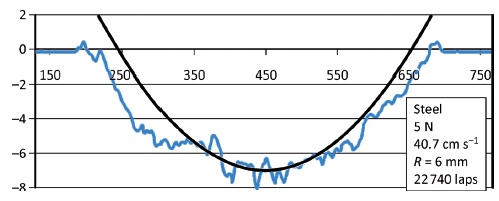
Fig. 8: Profile 1 (Sample St1)

Fig. 9: Profile 2a (Sample St3)
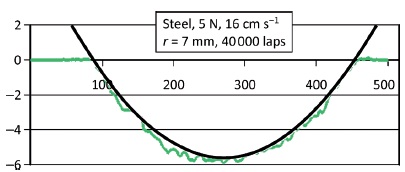
Fig. 10: Profile 2b (Sample St4)
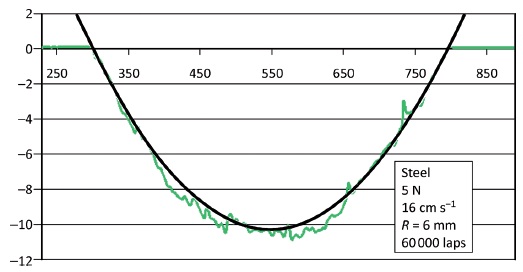
Fig. 11: Profile 2c (Sample St5)
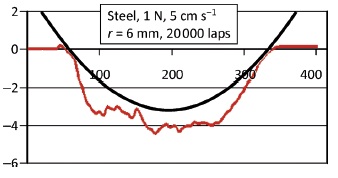
Fig. 12: Profile 3a (Sample St6)
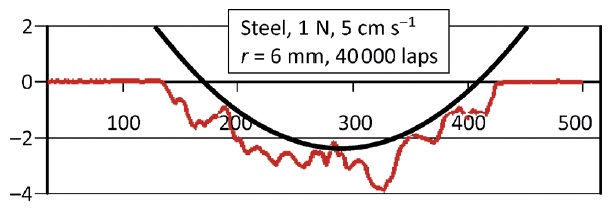 Fig. 13: Profile 3b (Sample St7)
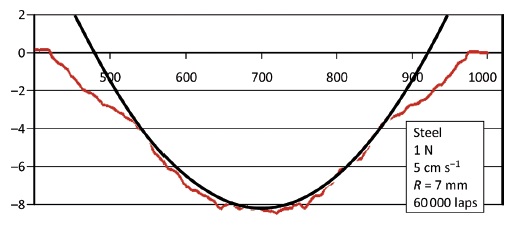
Fig. 14: Profile 3c (Sample St8)
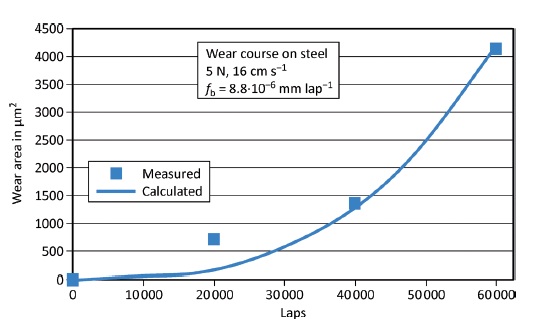
This overall unsatisfying reproducibility becomes evident also when the course of the mean profile area, and thus, of wear is considered (Fig. 15, Wear diagram 1). Here, only the area displaced by the friction ball is recorded. But apart from the initial regression after 40 000 laps in the case of 1 N and 5 N cm s–1 and apart from the low reproducibility, a distinct rise of wear area above 40 000 laps prevails. Also, the numerous variations in the profiles do not indicate any simple mathematical modeling. Apart from this, the slope is different from that described in literature (given for steel/steel pairings though) [5]. In particular, it becomes evident from these profilograms that wear in a cyclic process progresses nonlinearly, that profile area and thus wear are not simply connected to the applied load, and as a consequence, Achard’s presumption is inaccurate, i.e., BOD is unable to deliver a distinct material-specific wear coefficient.
4.2 Results for Hard Gold Coated Steel
Steel discs of equal kind and dimensions are used as substrates for the hard gold coatings. Coating thickness was usually approximately 10 μm, and in exceptions, approximately 20 μm (denoted thick). Hard gold refers to a gold-copper-cadmium alloy comprising approximately 75 percent gold, 20 percent copper, and 5 percent cadmium with Vickers hardness of 320 to 340 HV and ductility (according to [9]) of approximately 3 percent. Coating composition is determined by AAS (atomic adsorption spectrograph) after stripping and given in parentheses. Coatings are analyzed crystallographically via XRD [10]. They are deposited in an experimental bath using a rotating cylindrical module as shown in Figure 1. Compositions of the layers varied slightly. As for steel discs, strong variations in the results are probably due to the difficulties with BOD and to the complexity of the influencing factors. They are not, at least not primarily, caused by small physical and chemical deviations in the coatings. Unconsidered surface modifications, however, could play a role. For reducing such an influence, surfaces of the hard gold layers were additionally polished in most cases (indicated by pol. in diagrams). BOD conditions as well as evaluation methods of steel discs plated with hard gold were equal to those with uncoated steel discs.
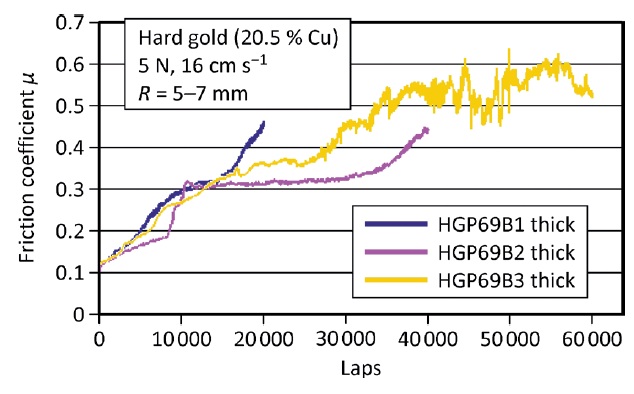
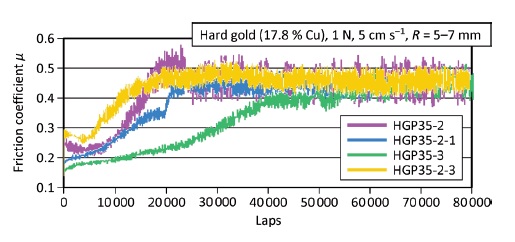
Tribograms 4 to 7 (Figs. 16 to 19) show that for hard gold layers, as for steel, oscillations in friction coefficients arise in some cases. These oscillations are stronger for low loads and high velocities. Other than for steel discs, the friction coefficients change in time. Starting from relatively low initial values in all cases they gradually rise, but neither reproducibly nor evenly distributed. Moreover, final values of the mean friction coefficient increase with load as well as with velocity (while they decrease for steel). In summary, in this case also, specific friction coefficients can not be identified. At best, the course of friction coefficients could be described as characteristic but not constant and dependant on test conditions.
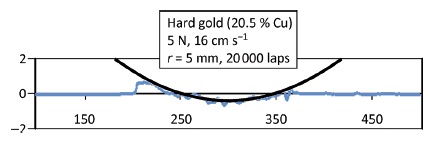
Fig. 20: Profile 4a (Sample HGP69B1)
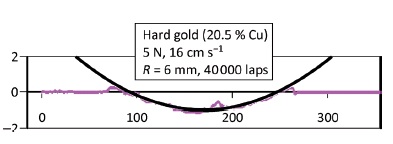
Fig. 21: Profile 4b (Sample HGP69B2)
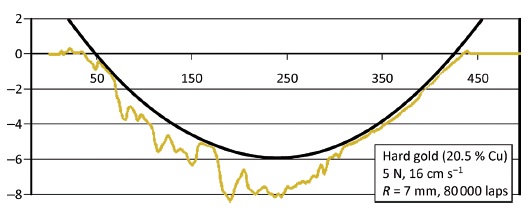
Fig. 22: Profile 4c (Sample HGP69A2)
 Fig. 23: Profile 5 (Sample HGP35–1-01)
 Fig. 24: Profile 6 (Sample HGP66A3)
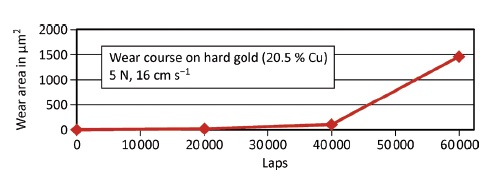
Profiles 4a, 4b, and 4c (Figs. 20 to 22) correspond to the tests according to Tribogram 4, acquired at a load of 5 N and velocity of 16 cm s–1 after 20 000, 40 000, and 60 000 laps. Here also, deviations from the shape of the friction ball are apparent. But other than in the case of steel where larger spreading occurs mainly in the upper edge regions, spreading in the case of hard gold layers takes place below and partly asymmetrically. In addition, the top edges even experience material accumulation (see also Fig. 2). The distinct indentation in Profile 4c (Fig. 22) is particularly worth mentioning. It may be an effect of sanding due to loose particles or to particles adhering to the ball. Such material was identified on the friction ball. It is also possible that the coating suffered from low adhesion to the substrate. As the corresponding Profilogram 2 (Fig. 25) shows, the wear area (versus lap number) proceeds nonlinearly, but initially more favorable than for steel (Profilogram 1, Fig. 15). In contrast, a sudden larger increase occurred after 40 000 laps.
At the end of the tests performed with a load of 1 N, groove depths were extremely low (e.g. Fig. 23, Profile 5 for 1 N, 5 cm s–1, 80 000 laps) or practically not detectable (e.g. Fig. 24, Profile 6 for 1 N, 1 cm s–1, 80 000 laps; note reduced depth scale).
5 First Conclusions
The present results do not entirely disqualify BOD but indicate that handling is difficult. This is due to the fact that optimum test conditions need to be found in extensive pretests in order to minimize various potentially chaotic influences. But even then, reproducibility remains low. In the present study, inevitably small orbiting radii probably added to the problem. Generally it has to be taken into account that BOD is a dynamic process with poorly defined initial conditions that leads to geometric changes. Wear debris may act as abrasive powder and lead to increased subsequent wear. Heavily oscillating friction coefficients can indicate that more or less chaotic wear is about to occur. Further evidence may be acquired from profiles in which the friction ball is positioned computationally in order to be able to identify indentations easily. Therefore, the present selected results indicate the following tendencies and comparisons:
Friction coefficients behave fundamentally different for steel and hard gold (deposited on steel). Whereas the friction coefficient of steel is high and more or less constant (besides oscillations) that of hard gold is initially small and then increases, however not in the same manner and not well reproducibly. In some cases (particularly at a load of 1 N and velocity of 5 cm s–1), friction coefficients remain constant but show oscillations. In general, oscillations of friction coefficients can be kept small by increasing the load for higher velocities.
For steel as well as hard gold coatings, wear (abrasion) behaves nonlinearly versus the cycle number (laps). In fact, wear increases unsteadily and abruptly, in particular on hard gold. This alone questions Achard’s wear coefficient and the corresponding trivial hypothesis. According to this hypothesis, wear on steel for a load of 5 N should be five times as high as for 1 N. However, this is not the case as Wear diagram 1 (Fig. 15) shows.
Comparing the results for steel and hard gold under equal conditions (1 N, 5 cm s–1, Profile 3c vs. Profile 5, Figs. 14 and 23, 5 N, 16 cm s–1, Wear diagram 3, Fig. 26), wear on hard gold is considerably lower, especially for 1 N and initially for 5 N. This illustrates the excellent features of hard gold compared to steel. In this context, it should be noted that the hardness of steel (approx. 760 HV) is more than twice as high as that of the gold-copper-cadmium alloy and still the latter behaves favorable in terms of tribological features.
Since these data do not yield any wear related material property, the next chapter focuses on interpreting the diagrams using a mathematical model that considers all relevant parameters.
6 Mathematical Model for Wear
Based on Wear diagrams 1 and 2 (Figs. 15 and 25), we will now attempt to find one or more mathematical representations. They should relate to a materialspecific constant and to the relevant parameters such as radius of friction ball, load, tangential velocity, and number of laps. It has to be taken into account that some measured values are inaccurate. Instead of wear, the profile area of the groove will be used as a parameter. Multiplied by the circumference of the groove, this yields the wear volume.
The assumption that the contact area between the friction ball and friction surface, which increases steadily due to carving, would relate to the wear volume was approved to some degree. For steel (5 N, and 16 cm s–1), wide linearity between the arc lengths of circular segments determined from Profiles 2a–c (Figs. 9 to 11), and the lap numbers are identified. The value after 20 000 laps deviated upwards which can be explained by irregular conditions as indicated by Profile 2a (Fig. 9). Arc lengths are calculated according to Figure 3, with the secant d and angle α
with ball radius r, where α is calculated via the sine according to Equation <5a>.
As a consequence, a material-dependent coefficient is proposed, we will refer to it as arc coefficient fb, connecting the lap number Z to the arc length b according to
with fb = mm lap–1. The arc coefficient fb corresponds to the gradient of the arc length versus the lap number. Here, it amounts to 8.8·10–6 mm lap–1 (related to the mean value at 60 000 laps). According to Equation <12>, the arc length calculated from this relation is connected to the radius of the friction ball.
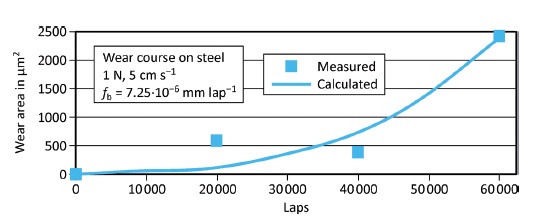
Analogous treatment of steel (1 N, 5 cm s–1) yields an arc coefficient of 7.25·10–6 mm lap–1. By means of these coefficients and by calculating the arc lengths and segment areas, the corresponding wear-profile areas may be calculated, leading to the courses in Wear diagrams 4 and 5, Figs. 27 and 28.
As can be expected, the arc coefficients are unequal for the two cases, but however, do not differ to the extent as could have been anticipated due to the differences in load. Thus, the arc coefficient does not represent a final material-specific constant. It should rather be assumed that it somewhat depends on test parameters, i.e., load and tangential velocity. In light of the results, proportionality to load and inverse proportionality to the tangential velocity v may be assumed, in which the load has to be multiplied with the friction coefficient. This means that the effect of load is compensated by velocity. Thus it seems plausible to introduce the quotient of these two terms as a relevant factor. This is a theoretically unexpected empiric result which requires further confirmation in future work. Correspondingly, this quotient can be termed a path-specific effect factor QF/v (where the effect is the product of force and time):
with QF/v = N s cm–1. Since the friction coefficient μ is approximately 0.5 in the first case and approximately 0.7 in the second, the two quotients amount to Q5/16 = 0.157 N s cm–1 and Q1/5 = 0.140 N s cm–1, respectively.
In order to obtain a material-specific constant, here referred to as friction effect constant Wb, the arc coefficient fB is divided by the path-specific effect factor QF/v:
with Wb = cm2 N–1 s–1 lap–1. This amounts to 5.6·10–6 cm2 N–1 s–1 lap–1 in the first case and 5.2·10–6 cm2 N–1 s–1 lap–1 in the second. These two values are not equal, as expected, but quite close. However, it has to be regarded that even minor differences have considerable effects on the wear computed from them.
Vice versa, when the friction impact constant Wb is known, the arc length may be calculated as a function of lap number, namely by combining Equations <13> and <15b>, yielding Equation <16>, which requires a known friction coefficient as well:
Furthermore, using Equation <4>, the arc length b together with the radius of the friction ball r, and segment angle α, yield the wear profile. Finally, the wear volume may be calculated by multiplying the wear profile and the groove circumference 2Rπ.
This equation comprises all tribologically relevant parameters including a single material-specific constant, Wb. It describes the regular course of wear. In doing so, it is assumed that the friction ball is inert and not subject to any changes caused by friction. The variety of the involved factors makes a semichaotic and irregular characteristic most likely. That this is in fact the case is indicated by a friction coefficient which oscillates strongly or changes significantly over time, by a fissured profile, as well as by behavior deviating from the course given by this equation.
According to this, in the case of hard gold (5 N, 16 cm s–1), see Wear diagram 2 (Fig. 25), the unusual and poorly reproducible course of the friction coefficient (Fig. 16, Tribogram 4) as well as the abnormal profile (Fig. 22, Profile 4c) indicate a course of friction severely irregular after 60 000 laps. However, the two initial wear values (after 20 000 and 40 000 cycles) are in good agreement with Equation <16>, yielding μ = 0.3 and Wb = 3.8·10–6 cm2 N–1 s–1 lap–1. This means that the wear diagram reveals a false and too negative impression with respect to the last measuring point.
References
-
W. Flühmann, W. Saxer, F. Aubert, H. E. Hintermann: Verschleissuntersuchungen an hochlegierten Goldniederschlägen, Galvanotechnik 65 (1974), 8
-
W. Saxer: Elektrolytisch abgeschiedene Überzüge für Gleitkontakte, Galvanotechnik 82 (1991), 10
-
ASTM G 99–05: Standard Test Method for Wear Testing with a Pinon-Disk Apparatus
-
P. G. Slade (Ed.): Electrical Contacts, New York/Basel: Marcel Dekker (1999), pp. 309–402
-
H. Czechos, K.-H. Habig: Tribologie-Handbuch, 2. Ed., Vieweg + Teubner (2003)
-
R. Holm, Electric Contacts, Berlin: Springer, 1946
PDF Version of the article |
Epub Version of the article |
Flash Version of the article |
| [qr-code size=”2″] | ||


