Phase composition and parameters of micro-structure and properties in plasma-sprayed alumina coatings on steel as a function of the substrate temperature (in the range 200 – 400 °C) and coating thickness have been analysed. It has been found that increasing the temperature of the substrate and the coating thickness from 90 to 500 μm leads to the change of the phase composition and residual macrostresses. In all the investigated coatings the predominating is γ-Al2O3 phase although some α-Al2O3 and amorphous alumina have been also formed. At higher substrate temperature and higher coating thickness a lower amount of the amorphous phase and a higher amount of the α-Al2O3 have been formed. In all the investigated coatings tensile residual macro-stresses parallel to the surface have been fixed. Their value is minimal in the thicker (500 μm) coating which together with the observed in this deposit minimal share of the amorphous phase and maximal contribution of the α-Al2O3 is in a good agreement with its maximal wear-resistance.
1 Introduction
Surface engineering is an economic way for the production of high-quality materials and machine parts for many industrial sectors. Plasma spraying has become a leading industrial technology for the application of hard, wear- and corrosion-resistant coatings on different substrate materials. In this technique, a high energy heat source is used to melt and project fine particles onto the substrate material. On impact, the molten droplets cool down by heat transfer to the substrate and solidify in strongly non-equilibrium conditions to form the film.
Air plasma spraying (APS) is a relatively simple method and is a widely used commercial technique for the application of ceramic deposits, in particular alumina coatings. However, as has been observed previously [1-4], the applied APS coatings usually contain some typical defects, namely lattice imperfections, residual stresses, voids, cracks, incorporated un-melted and oxidized particles, etc. which must be controlled because of their influence on the properties of the coatings.
Alumina (Al2O3) possesses some useful properties, namely high hardness, wear- and corrosion-resistance, protection abilities against the permeation of different kinds of radiation, specific electric and optic properties. These all are properties, which make the coated materials with Al2O3 very useful for a number of industrial sectors such as the production of cutting tools and for the needs of optical, microelectronics, reactor industries etc. [5 – 12]. The microstructure parameters of alumina coatings and hence their macro-properties are strongly dependent on the technology of application. For example, in Ref. [12] the effect of substrate temperature on the microstructure and properties of Al2O3 coatings applied on steel by pulsed magnetron sputtering has been analyzed. It has been shown that depending on the substrate temperature (Ts) the coating may have either amorphous (at lower Ts) or polycrystalline (at higher Ts) microstructure, the latter being built up either by γ-Al2O3 or α-Al2O3, or by a mixture of these two polymorphous modifications of alumina. According to the same reference, the transformation from amorphous to polycrystalline structure is accompanied by a hardness increases from 10 GPa (corresponding to the amorphous alumina) to 19 GPa (when the coating is built up by γ-Al2O3) or even to 22 GPa (for the coating built up by α-Al2O3).
In the present paper, the influence of the spraying conditions during the air plasma spraying (APS) of alumina coatings on their phase composition, microstructure parameters and wear-resistance has been studied.
2 Experimental techniques
2.1 Plasma spraying of coatings
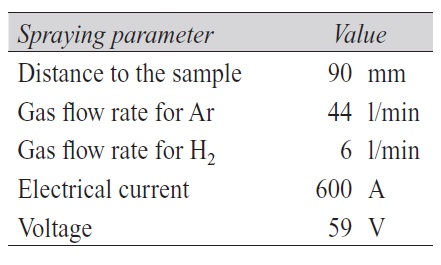
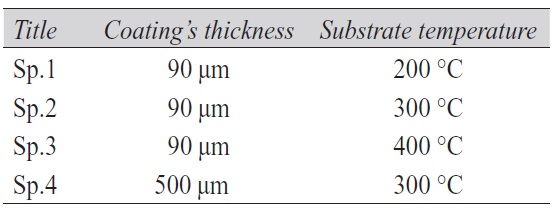
From the substrate material, which was 3 mm thick sheet ferrite steel ST37, a number of rectangular 70×50 mm samples were cut. Just before the coating applications, the substrate surface was sand-blasted to a roughness Ra = 4 μm, cleaned with acetone and dried. The atmospheric plasma spraying (APS) of the coating material (Al2O3 powder) was performed by Medicoat AG apparatus. A mixture of argon and hydrogen was used as a plasma gas. The spraying parameters, with the exception of the substrate temperature and coating thickness, were kept the same for all the applications and are given in Table 1. The description of the analysed coatings is listed in Table 2. During the spraying process the substrate temperature was measured by a thermocouple fixed to the back surface of the coated plate. In order to reduce the number of experimental variables measures were taken to keep the substrate temperature approximately constant trough the whole of each coating run. Since the samples were heated by the plasma jet itself, temperature was controlled by directing the plasma alternately towards and away from the substrate. In this way it was possible to keep the various substrates at the previously planned values of 200 °C, 300 °C and 400 °C throughout the spraying process.
2.2 Description of the experimental techniques
X-ray powder diffraction experiments were performed on URD6 Seiferd & Co diffractometer with Cu Kα radiation and secondary plane graphite monochromator placed in front of the scintillation detector. Two geometries, namely symmetric Bragg-Brentano (B-B) [13] and grazing incidence asymmetric Bragg diffraction (GIABD) [14] have been employed for the registration of diffraction patterns. A schematic showing the orientation of crystallographic planes contributing to the formation of diffraction peaks for the two geometries is represented in Figure 1. The patterns registration in the B-B mode is realised via the usual θ-2θ scans while for the registration in the GIABD mode the sample is fixed at a constant incident angle (α) and only the detector performs a 2θ scan.

Fig. 1: Schematic of the symmetric B-B (a) and GIABD (b) geometries
For the quantitative estimation of the diffraction peak parameters they have been computer simulated applying three of the analytical fitting functions suggested in Ref. [15]. For all the analysed peaks, the best fit was obtained with a Pseudo-Voigt function. Phase composition, crystallographic texture and residual stresses in the applied coatings have been studied.
Wear-resistance tests were performed on Saml. Deniso & Son Ltd. equipment with 0.25 inch (6.35 mm) WC ball loaded with 100 g and performing circular runs with a velocity of 3 000 runs per minute on the sample surface. The interaction between the WC ball and the investigated coating was, 30 min. The wear-resistance was characterised by the width of the circular trace made by the ball on the surface.
3 Experimental results and discussion
3.1 Phase composition
Figure 2 represents the diffraction patterns registered in B-B geometry for the initial Al2O3 powder (Fig. 2a) and the sprayed alumina coatings (Fig. 2b and 2c). It is obvious that the patterns of the applied coatings differ from those registered for the initial alumina powder. The more precise observation of these patterns in a proper scale and the qualitative X-ray phase analysis subsequently performed showed that the initial powder is a mono-phase and contains only α-Al2O3 while the sprayed coatings which have predominately polycrystalline microstructure contain a mixture of two phases namely γ-Al2O3 and α-Al2O3. The standard JCPDS patterns (namely PDF 10-0425/1997 and PDF 46-1212/1997) corresponding to these two phases are given at the bottom of the figure.
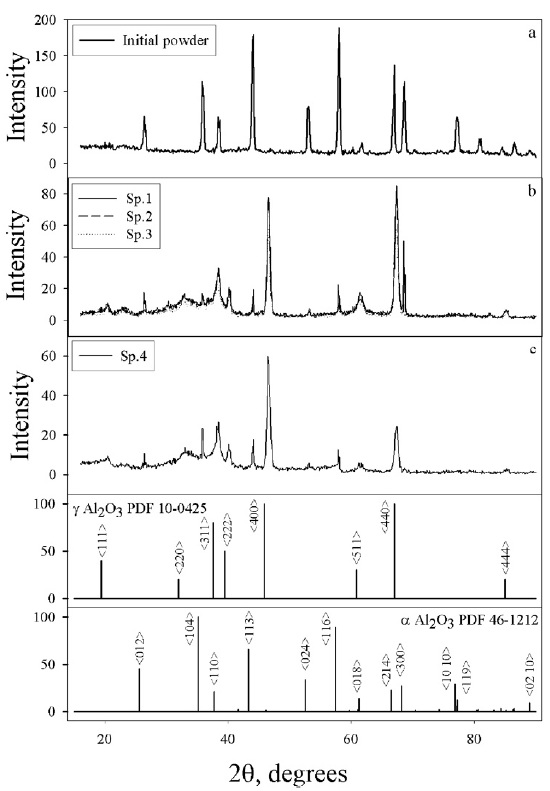
Fig. 2: X-ray diffraction patterns for the initial alumina powder (a) and for the applied thin (b) and thick (c) coatings together with the JCPDS standard files for α-Al2O3 and γ-Al2O3
According to the binary Al-O system, the only stable phase is α-Al2O3, but there are in addition a few metastable phases one of which is γ-Al2O3. The α-Al2O3 and γ-Al2O3 represent two polymorphous modifications the first of which belongs to the hexagonal crystallographic system (R3–c space group) while the second is related to the cubic system (Fm3–m space group). The presence of the metastable γ-Al2O3, which was not presented in the initial powder, could be attributed to the non equilibrium solidification of the arriving molten particles to the steel substrate. The proportions of the observed alumina phases have been evaluated using the following theoretical expression for the diffraction peak intensity [13] applied in the present investigation to the α-Al2O3 phase:
where:
I0 – intensity of the initial beam;
e2/mc2 – classical electron radius;
θ – Bragg angle,
Fhkl – structure factor;
μ – linear absorption coefficient;
phkl – multiplicity factor;
Vu.c. – unit cell volume;
T – Debye-Waller factor;
Vα – volume fraction of the analyzed phase.
Thus, taking into account that the initial alumina powder contains 100 % α-Al2O3 and from the relation between the intensities of any two corresponding {hkl} diffraction peaks registered under the same conditions from the initial powder and from the sprayed coating, the volume share of the α-Al2O3 phase in the coating (Vαcoating) can be estimated from the following expression:
In the present investigation, the intensities (Iαhkl) of the corresponding diffraction peaks registered for the analyzed coatings and the initial powder have been evaluated by fitting with a Pseudo-Voigt expression. The unit cell volumes have been measured using the crystallographic computer program Powder which requires as input parameters the angular positions of all the registered peaks for α-Al2O3 (i.e. their centroids, defined via the performed fitting), the corresponding Miller indexes {hkl}, the symmetry group of the analyzed alumina phase and the used X-ray wavelength.
Thus, from the evaluated intensities of the corresponding diffraction peaks and the unit cell volumes for the initial powder and analysed coating, and having in mind that Vαpowder = 100%, from equation <2> the volume fraction (Vαcoating) of α-Al2O3 in the coating can be evaluated. This analysis has been performed for {104} and {113} α-Al2O3 diffraction peaks and the results are represented in Figure 3. It is obvious that in all the deposits, the share of the alpha alumina phase is less than 10 % and is the highest in the thickest coating (Sp.4). For the thin coatings, a tendency of an increase in the fraction of alpha alumina with increasing application temperature is observed. Obviously in these coatings increasing the substrate temperature leads to the solidification of the arriving liquid droplets at a lower rate (i.e. at conditions closer to equilibrium) which favors the formation of the stable α-Al2O3 phase. For the thick coating (Sp.4) the longer application period during which the already deposited material is exposed to a high temperature influence is probably the factor which promotes the transformation of the initially formed metastable γ-Al2O3 into the stable α-Al2O3 phase.
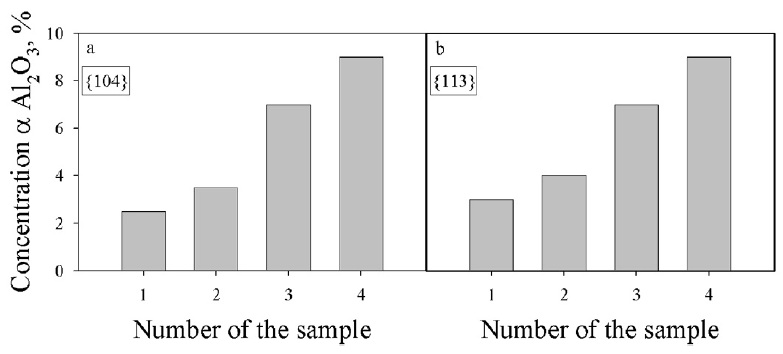
Fig. 3: Results from the quantitative phase analysis performed using the intensities of the {104} (a) and {113} (b) α-Al2O3 diffraction peaks
Although the diffraction patterns represented in Figure 2b and 2c are typical for polycrystalline materials, in the range of 2θ between 25° and 40°, the background has an increased intensity which reveals that in the applied coatings in addition to the predominately polycrystalline phases, a small amount of a disordered and amorphous-like phase has also been formed. This particular region of the registered patterns with the increased background (amorphous halo) and diffraction peaks on the top of it is represented in Figure 4. As it is obvious when the temperature is higher (Fig. 4a and 4b) and the application period is longer (as it is for the thick coating – Fig. 4c) the amorphous halo tends to decrease in intensity which means that under these conditions the formation of crystalline phases is encouraged. In Figure 4d the amorphous halo region corresponding to the thick coating (Sp.4) and registered in B-B and in GIABD geometries is presented. As the X-ray beam penetration depth in materials increases when the incident angle is higher, the appearance of the amorphous halo in the three patterns points out that the formed disordered amorphous-like phase is contained through the whole thickness of the coatings including the top surface layers and thus do not represent a transition layer between the substrate and the coating.

Fig. 4: Amorphous halo for the investigated coatings registered in B-B geometry (a, b, c) and its dependence on the incident angle (i.e. the penetration depth) of the incident X-ray beam (d)
3.2 Residual macro-stresses
Non equilibrium solidification and the repeated heating-cooling cycles usually lead to the formation of significant residual macro-stresses in the coatings applied by plasma spraying. The analysis performed in the present study of residual macro-stresses is based on the well known sin2ψ X-ray diffraction method, and is described in detail in Refs. [13, 16, 17]. According to this method a linear dependence exists between the interplanar distances dhkl of a particular family of crystallographic planes {hkl} and sin2ψ (where ψ is the angle between the analysed {hkl} planes and the investigated surface). The dhkl have been evaluated from the fitted diffraction peak value via the Bragg equation:

Fig. 5: Linear dependencies dhkl versus sin2ψ plotted for the {hkl} peaks of the thick coating (Sp.4): a){440} γ-Al2O3; b) {113} α-Al2O3; c) an overlapped peak corresponding to {018} α-Al2O3 + {511} γ-Al2O3
where:
θ – peak centroid, obtained from the performed computer simulation;
λ – wavelength of the used characteristic X-ray radiation.
In Figure 5 some of the plotted dhkl – sin2ψ dependencies for the thick coating (Sp.4) are represented. Similar plots have been made for all the investigated coatings and in all cases the linear dependencies with positive gradients have been observed. According to Ref. [16] the residual macro-stresses acting parallel to the investigated surface can be evaluated as follows:
where:
E and ν – X-ray elastic constants, namely Young’s modulus and Poisson’s ratio, respectively, corresponding to the analyzed crystallographic direction;
d0 and ∂d/∂(sin2ψ) – intercept on the d-axis and the gradient in the linear plot dhkl versus sin2ψ respectively.
From equation <4> it follows, that the residual macro-stresses will be positive, i.e. tensile (σ > 0), when the gradient of the plots of dhkl against sin2ψ which were linear for all the investigated coatings in the present study, is positive. This result agrees with the theoretical model of Kuroda and Clyne [18] for residual stresses in thermally sprayed coatings formed due to quenching. Because of a lack of data for the X-ray elastic constants in different crystallographic directions of alumina, the quantitative estimation of the fixed residual macro-stresses was not possible. However, a comparison of the gradients in the plots dhkl versus sin2ψ (Tab. 3) shows that the value corresponding to the thick coating (Sp.4) is lower than those observed for the thinner deposits. The results presented in Table 3 suggest that the formed tensile residual macro-stresses decrease with increasing coating thickness and do not depend on the coatings temperature within the investigated temperature range (200 to 400 °C).
Tab. 3: Gradient values ∂d/∂(sin2ψ) in the linear plots d113 versus sin2ψ / Gradienten ∂d/∂(sin2ψ) der linearen Kurven aus d113 gegen sin2ψ
This result may be due to the fact that the thicker coatings are exposed to the influence of high temperature field longer than the thinner ones. It is known that the residual macro-stresses fixed in the material cause an persistent elastic deformation of its crystal lattice and thus lead to an increase of the internal energy of the material. Thus, the state with high residual macro-stresses is thermodynamically unstable and in such a material some relaxation processes will tend to take place.
For the case of thermal spraying, during the growth the deposits experience the influence of two fields namely high temperature and mechanical, the last caused by the arriving to the surface new particles with relatively high speeds. As a result of the mechanical momentum transfer from the new coming particles to the growing coating the diffusion mobility of its atoms will be higher than when they are exposed to the high temperature influence only. This increased mobility will encourage the redistribution of atoms, i.e. the occurrence of some relaxation processes which is expected to result in a decrease of the formed residual macro-stresses. One possibility for such a relaxation may be the case when for some of the crystallites due to the mechanical forces the residual micro-strain transforms into plastic, i.e. when the atoms perform a jump from the interstitial to the lattice point positions. In a macro-scale the result would be a decrease of the residual elastic strain and the residual stresses related.
3.3 Crystallographic texture
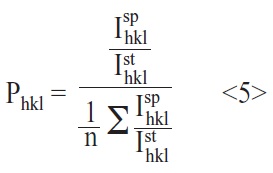
In former studies [4, 19] it has been shown that in a number of APS metallic coatings, a preferred crystallographic orientation (crystallographic texture) has been observed. In the present paper, an analysis of a preferred crystallographic orientation in the studied alumina APS coatings has been performed using evaluation of the pole density Phkl from the registered B-B geometry X-ray diffraction patterns. The Phkl value is proportional to the probability that a particular family of crystallographic planes {hkl} are oriented parallel to the surface of the coating. In this study, Phkl has been estimated for the predominant γ-Al2O3 phase according to the following Equation <5>:
where:
Isphkl and Isthkl – intensities of the corresponding {hkl} X-ray diffraction peaks for the investigated coating and a texture-less γ-Al2O3 standard, registered under the same conditions applying B-B geometry;
n – number of the analyzed diffraction peaks (only the lowest diffraction order).
Because no γ-Al2O3 powder was available, the Isthkl values were taken from the intensities of the corresponding γ-Al2O3 X-ray peaks given in the standard data base JCPDS (file No 10-0425, 1997). The X-ray patterns have been registered at two perpendicular surface directions defined by the azimuthal φ angles namely φ = 0° and φ = 90°. The shares of Phkl corresponding to different crystallographic {hkl} planes are represented in Figure 6. It is obvious that in all the coatings no strong crystallographic texture has been formed. The biggest (about 60 %) is the contribution of the micro-volumes which are oriented so that their {110} or {100} crystallographic planes are parallel to the surface. The shares of each of these texture components are almost equal (about 30 % each). No significant differences between the Phkl values estimated for the two perpendicular surface directions (i.e. at φ = 0° and φ = 90°) have been observed which means that the crystallographic directions distribution in the coatings surfaces is also close to random.
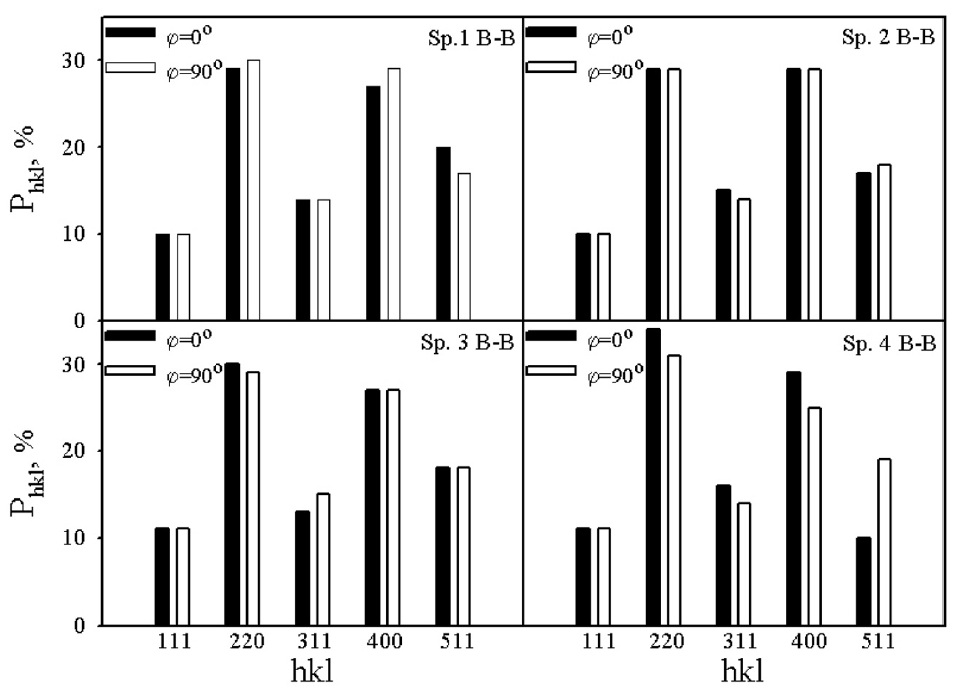
Fig. 6: Charts representing the share (Phkl) of different texture components in the predominating polycrystalline γ-Al2O3 phase of the investigated alumina coatings
3.4 Wear-resistence
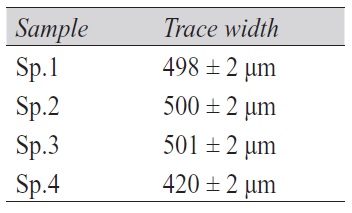
As mentioned above, the wear resistance has been characterized via the width of the trace made by the WC ball on the surface. The results are presented in Table 4 from which follows that the wear of the coating is more sensitive to coatings thickness than to the application temperature, a tendency seen also for residual macro-stresses. The observed increase of the wear-resistance in the thick coating correlates well with the already discussed above increased share of the stable α-Al2O3 phase and lower values of the fixed tensile residual stresses in this sample with respect to the thinner ones.
Tab. 4: Width of the trace on the coating surface measured after the wear-resistance tests

4 Conclusions
Because of the non-equilibrium solidification of the liquid droplets arriving at the coated surface the films applied by plasma spraying technique may contain some metastable and unstable phases. Although the initial powder was 100% α-Al2O3, the predominating phase in the investigated APS alumina coatings on steel is metastable γ-Al2O3 while the contribution of the stable α-Al2O3 is less than 10 %. In addition to these two polycrystalline phases, some amount of highly disordered amorphous- like alumina distributed through the whole coating thickness has also been formed.
Higher application temperatures lead to a greater proportion of α-Al2O3 and to a smaller proportion of γ-Al2O3 in the investigated thinner coatings. From all the studied coatings the thicker one has the greatest fraction of the stable α-Al2O3.
Due to the repeated heating-cooling cycles, tensile residual stresses parallel to the coatings surface have been formed. Their value does not depend on the substrate temperature (within the investigated range between 200 °C and 400 °C), but is sensitive to the thickness of the coatings and decreases with the thickness increase.
The maximum is the wear-resistance of the thicker (500 μm) coating which correlates with the lowest value of the tensile residual stresses and the highest share of the hardest α-Al2O3 phase observed in this deposit compared to the other investigated.
Acknowledgement
Financial supports from the Scientific funds at the Bulgarian Ministry of Education and Science and at the University of Sofia are highly appreciated
References
- W. Gissler, H. A. Jehn (eds.): Euro courses, Mechanical and Materials Science, v.1; Advanced Techniques for Surface Engineering, Klwer Acad. Publishers, (1992)
- D. I. Pantelis, P. Psyllaki, N. Alexopoulos; Wear, 237 (2000), 197
- I. Iordanova, M. Surtchev, K. S. Forcey; Surf. Coat. Technol., 139 (2001), 118
- I. Iordanova, V. Antonov; Galvanotechnik, 3 (2003), 682
- M. Scherer, J. Schmitt, R. Latz, M. Schannz; J. Vac. Sci. Technol., A 10 (1992), 1772
- P. Frach, U. Heisig, Chr. Gottfried, H. Walde; Surf. Coat. Technol., 59 (1993), 177
- K. K. Shih, D. B. Dove; J. Vac. Sci. Technol., A 12 (1994), 321
- K. S. Forcey, D. K. Ross, J. C. B. Simpson, D. S. Evans, A. G. Whitaker; J. Nucl. Mater. 161 (1989), 108
- K. S. Forcey, D. K. Ross, C. H. Wu; J. Nucl. Mater., 182 (1991), 36
- K. S. Forcey, A. Perujo, F. Reiter, P. L. Lolli-Ceroni; J. Nucl. Mater. 200 (1993), 417
- G. Nutsch, B. Dzur; in Mater. 15th Intern. Symposium on Plasma Chemistry, Orleans, (2001)
- O. Zywitzki, G. Hoetzsch, F. Fietzke, K. Goedicke; Surf. Coat. Technol., 82 (1996), 169
- Taylor: X-ray metallography, John Wiley & Sons, New York, (1961)
- C. Huang; Advances in X-ray analysis, 33 (1990), 91
- J. I. Lankford; Progress Cryst. Growth and Charact., 14 (1987) 185
- P. S. Prevey: X-ray Diffr. Res. Stress Techn. Metals handbook, v.10, ninth edition (1986), American Society for Metals, 380
- I. Iordanova, V. Antonov, S. Gurkovsky; Surf. Coat. Technol., 153, (2002), 267-275
- S. Kuroda, T. W. Clyne; Thin Solid Films, 200 (1991), 49
- I. Iordanova, K. S. Forcey; Surf. Coat. Technol. 91 (1997), 17
PDF Version of the article |
Flash Version of the article |
|
| [qr-code size=”2″] | ||

